Smart contracts
This document explains how to work with smart contracts. First we'll establish the mental model of working with blockchains. If you are already familiar with the NEO blockchain or talking to smart contracts on blockchains in general you can go directly to the interaction section. Next we'll look have a what comes in to play in a basic smart contract interaction. Followed by that we build an understanding of how the wrappers work before diving into the breakdown of a NEP-17 token transfer where all learned comes together.
After reading this chapter you'll have an understanding of the major components involved in interacting with smart contracts. You be able to do all common interactions with a smart contract of choice and have the foundational knowledge that allows you to follow the examples on the Github repo.
What are smart contracts?
Smart contracts are nothing more than programs of which the compiled code is stored on the blockchain. They expose a public API which you can call to execute its functions, whether that be transfering tokens, executing some algorithm or just reading stored data is up to the contract author. It is important to realise that the smart contract code does not live on your machine and is executed on a remote network (the blockchain).
Add to this that smart contracts are "compiled" to a custom language and executed by a custom processor (the NEO Virtual Machine). That means that your Python code cannot talk Python to the smart contract, but that a translation has to happen. This library performs that translation under the hood and helps communicate between your machine and the smart contract.
Interacting with smart contracts
There are 2 layers in this library used to talk to smart contracts. First, wrappers for various
smart contract types to make calling functions on them feel almost the same as calling
regular Python code. Second, a ChainFacade class which acts as the network gateway. It will build and sign a
transaction if state needs to be persisted or use other means for read-only (free) executions.
Lets breakdown the following example which queries the blockchain for the symbol of the Neo token contract and
will return NEO as result.
facade = ChainFacade.node_provider_mainnet()
neo = NeoToken()
await facade.test_invoke(neo.symbol())
1 creates a facade for communicating with the MainNet. While it can be configured to perform automatic
transaction signing when persisting state, for now it is only important to know that this configured the facade to talk
to a MainNet RPC node internally.
Line 2 instantiates our first wrapper. The NeoToken class wraps around the native NeoToken
smart contract (built-in to the chain) and gives a convenient way of calling the public functions of the smart contract.
Line 3 is where the interesting parts happen. The call to neo.symbol() does not actually return "NEO", instead it
builds a sequence of NEO Virtual Machine instructions that the network understands. These instructions need to be sent
to the network, which is where the facade comes in to play. The facade has two ways of sending the instructions
test_invoke()- Use for read-only calls. Does not cost GAS.invoke()- Use for state changing calls. Costs GAS.
Tip
There are multiple variations of the *invoke*() call such as invoke_fast and invoke_multi. See the API docs
for more information.
In the example above test_invoke() is used because the symbol() function does not modify state. It just reads data
stored and so there is no reason to pay for it and grow the chain unnecessary. In later sections and chapters state
modifying transactions will be discussed. We'll also learn how to sign and pay the transactions with an account of our
choice. For now let's first get a greater understanding of the various wrappers that exist.
Contract wrappers
The smart contract wrappers are a key component in simplifying smart contract interaction. Like the facade they live in
the neo3.api.wrappers module. The NEO blockchain has a few native contracts build into the chain such as the NEO and
GAS tokens, but also contracts providing information regarding the chain configuration like the
PolicyContract.
For these kind of contracts specialised wrappers exist like NeoToken, GasToken, PolicyContract and RoleContract.
Types of smart contracts
Technically speaking there are no types of smart contracts. However, they can implement standards that give
them compartalisable behaviour. For example implementing NEP-11
gives NFT like behaviour, NEP-17 gives
fungible token behaviour. NEO and GAS are examples of NEP-17 tokens, but there are many more NEP-17 tokens in the system.
To easily use these contracts there are more generic wrappers available such as NEP17Contract, NEP11DivisibleContract and
NEP11NonDivisibleContract.
All they require is the contract hash and you're ready to call them like NEO or GAS. For example wrapping the TOTHEMOON token is done as follows
from neo3.core import types
from neo3.api.wrappers import NEP17Contract

contract_hash = types.UInt160.from_string("0x56199aa066633745de4d603e6477881455c08243")
ttm = NEP17Contract(contract_hash)
transfer() TTM tokens, query the balance_of() an account or call any of the other NEP-17 methods. If the
contract exposes additional functions beyond those from the standard then there is the generic
call_function(<name>,<args>) that can always be used.
Lastly, if none of the existing wrappers suit the contract use GenericContract or better create your own wrapper on
top of GenericContract.
Hierarchy
In the previous section we described the various wrapper classes that can be used from most specialised to most generic. The diagram below shows the structure
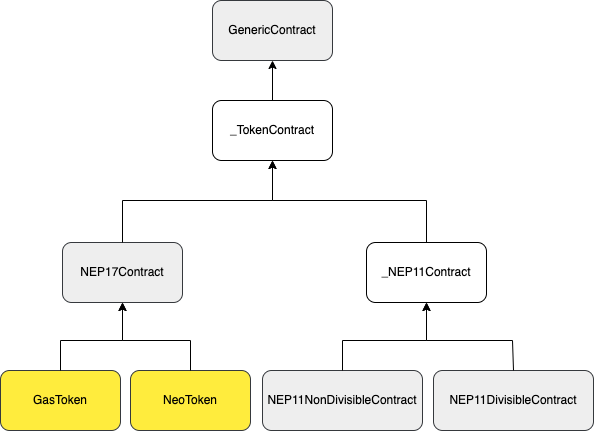
- Yellow are the most specialised wrappers.
- White are building blocks and not intended to be used on their own. They are shown to make the picture complete.
Modifying chain state
This section shows what it takes to modify chain state, specifically we'll show how to transfer a NEP-17 token (NEO) and break down the steps and options.
We've previously seen how to query the symbol of a contract by using the test_invoke()
method on the facade. Such queries do not modify state and thus does not require validation by the consensus nodes.
Transfering a token, which changes the balance of 2 accounts, on the other hand does require verification to prevent
unauthorized transfers. This verification and transfer script execution costs compute and thus has a GAS price
associated to it.
State modifications always need to be communicated to the network using a Transaction.
This container will hold the script that executes the transfer action, signatures for
approval of the modification and has GAS attached to pay for the verification and execution fees.
NEP-17 transfer example
Let's see how this looks in code and then break it down line-by-line.
import asyncio
from neo3.api.wrappers import ChainFacade, NeoToken
from neo3.api.helpers.signing import sign_with_account
from neo3.network.payloads.verification import Signer
from neo3.wallet.wallet import Wallet


async def main():
    neo = NeoToken()

    wallet = Wallet.from_file("./mywallet.json")
    account = wallet.account_default

    facade = ChainFacade.node_provider_mainnet()
    facade.add_signer(
        sign_with_account(account),
        Signer(account.script_hash)
    )

    destination = "NUVaphUShQPD82yoXcbvFkedjHX6rUF7QQ"
    print(await facade.invoke(neo.transfer(account.address, destination, 10)))

if __name__ == "__main__":
    asyncio.run(main())
Wallet account setup
Skipping the imports, startup boilerplate code and NeoToken wrapper creation (that we've seen before) we start here
In order to transfer tokens we need to have an account with funds to transfer them from. Secondly, all transactions are paid for withGAS. So while this example transfers NEO, the account must also hold a bit of GAS to pay for the
fees. For the aforementioned reasons we assume you already have a NEP-6
wallet that we'll load from disk.
Tip
If you want to learn upfront how much gas a transaction will cost then use the estimate_gas() helper on the facade.
Facade setup
Next up is setting up and configuring the facade to automatically sign our transaction(s).
facade = ChainFacade.node_provider_mainnet()
facade.add_signer(
    sign_with_account(account, password="123"),
    Signer(account.script_hash)
)
ChainFacade. The facade can be configured to
automatically use a specific wallet account for signing transactions when invoke() is called on the facade. This is
done through the add_signer() function which takes two arguments
- a callback function to perform the actual transaction signing
- a Signer object indicating where the signature is valid
The callback function takes the provided account information, creates a signature and embeds it in the Transaction.
It states that account agrees with the modification that the transaction script will perform. The consensus nodes
will verify the validity of the signature before performing the transfer.
The Signer will have a scope of CALLED_BY_ENTRY by default. This means that the signature is only valid inside the
first contract called. In this case that will be the NeoToken contract. This scope can be checked by the
CheckWitness function inside smart contracts to avoid abuse. There are many scenarios where one contract may need to
call one or more other contracts. For such cases the signer can be configured with other scope options and rules. This
however is beyond the scope of this example and can be learned more about in this excellent article
by the NSPCC.
Note
- Calling
test_invoke()instead ofinvoke()will automatically add theSigner, without calling the callback, to limit the scope. This is useful if you want to realistically simulate your state changing calls. - You can add multiple signers. The first signer added is considerd the
senderand will pay for the fees.
Invoke & receipt
Now that we're done with the preparation we can perform the actual transfer.
Theneo.transfer() call will generate VM instructions to perform the requested token transfer. The instructions are
passed to facade.invoke() which builds the transaction, signs it and sends it to the network. It will wait and poll
the network for a receipt and print that. Among the result of calling the transfer function the receipt contains
notifications emitted by the smart contract(s) and more.
An example receipt for the transfer may look as follows
InvokeReceipt(
    tx_hash=619759221b434356e76783534b7ca9dc8c8ec36f25c1943c2262f727736c862a,
    included_in_block=18419,
    confirmations=3,
    gas_consumed=9977750,
    state=HALT,
    exception=None,
    notifications=[
        Notification(
            contract=d2a4cff31913016155e38e474a2c06d08be276cf,
            event_name=Transfer,
            state=StackItem(type=ARRAY, value=[
                StackItem(type=BYTE_STRING, value=b'3\xfc\xa3\x0b\xc0,\x81%\xc2\xb7\xb0\x85\xb7\x96\x13Pk\xbf=O'),
                StackItem(type=BYTE_STRING, value=b'^\x1c{1\xf3\xd1\x9b\xc3\xb9\xaeaY\xee\x80v\xc7\xcb1\x11z'),
                StackItem(type=INTEGER, value=10)
                ]
            )
        )
    ],
    result=True
)
Tip
If you would like to return immediatly and not wait for a receipt use invoke_fast() instead of invoke().
This will return a transaction id.